
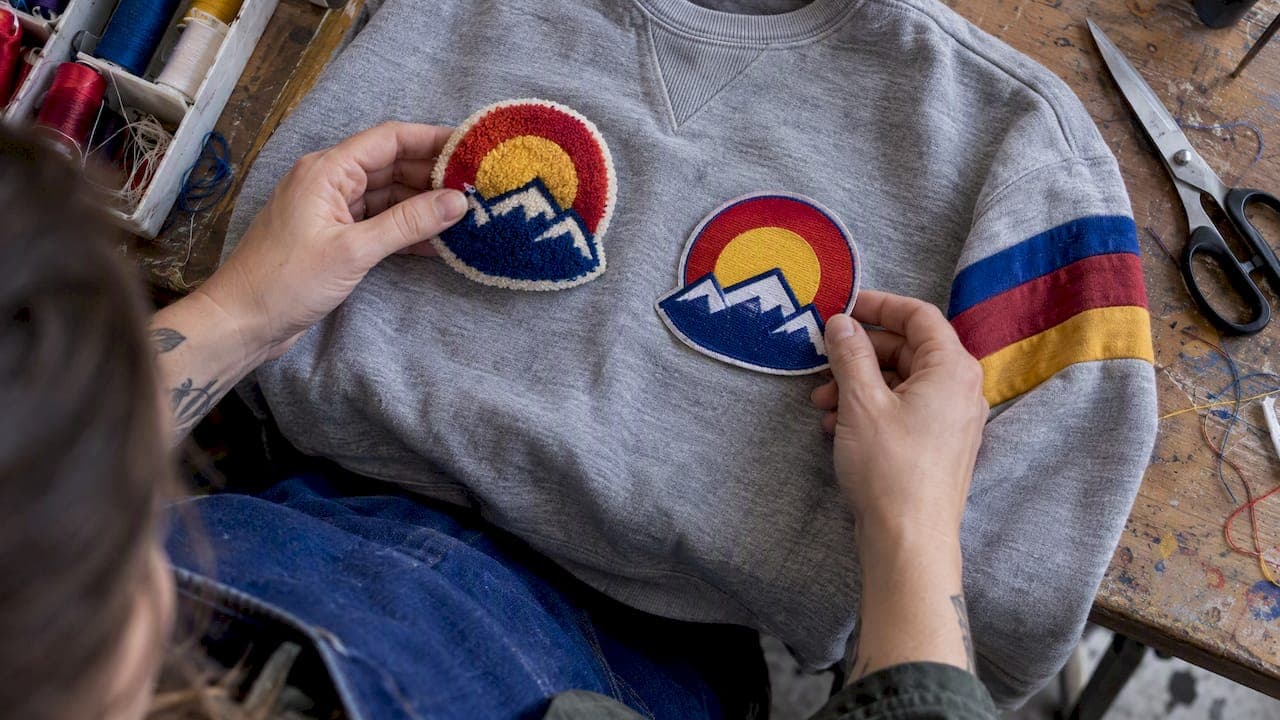
Chenille patches are raised, looped-pile emblems built from Moss and Chain stitches, while standard embroidery relies on lockstitch thread work that lies flatter and holds finer detail — reasons why embroidered textiles are worth choosing for branding when durability and clarity are key. Pick chenille for bold, simple shapes like varsity letters, and choose embroidery for small logos or garments that face heavy abrasion. Each method also asks for different machines and laundering habits, which later sections break down in practical terms.
TL;DR:
- Chenille patches with Moss and Chain stitches create a raised, fuzzy surface suitable for bold shapes, but are less effective for small, detailed logos.
- Producing true chenille requires dedicated machines or attachments, as standard embroidery machines cannot replicate the looped pile with Moss stitches.
- Chenille patches wear differently, with pile loss and color shifts over time, and require specific laundering tests before approval.
- Design small, fine details and thin lines are better suited to embroidery, while large, simple shapes benefit from chenille's bold texture.
- Garment and patch placement influence durability, with heavier patches on thicker fabrics like hoodies, and careful attention needed for wash and wear conditions.
Table of Contents
- Stitch mechanics: how Moss and Chain stitches create two different looks
- Machines and workflow: what equipment and settings you actually need
- Appearance, detail and sizing: what reads well in each technique
- Durability and care: what the evidence says about wear and washing
- Construction choices: backing, edges and how patches get attached
- DIY versus professional production: when to outsource the job
- Quick decision checklist and use-case matrix
- Rob's perspective: how we pick patch construction at Native303
- FAQ
- Sources
- Where we take this next
Stitch mechanics: how Moss and Chain stitches create two different looks
The visual gap between these two techniques starts at the stitch level. Moss and Chain stitches are the two stitch types that define true chenille: Moss builds a dense, looped pile that gives the fuzzy, raised surface, while Chain secures borders and handles delicate fills without the bulk. Standard embroidery instead relies on lockstitch, satin, and outline stitches that lock thread flat against the fabric, which is how it renders small text and shading.
This mechanical difference drives how designs get digitized:
- Chenille uses compound objects with built-in offsets and borders rather than individual stitch paths.
- Embroidery digitizing favors satin columns and fine fills for gradients, outlines, and tiny type.
- Chenille designers think in shapes and volume, while embroidery designers think in line and detail.
A logo digitized for one rarely translates cleanly to the other without a redesign, since the stitch engine behind each produces a fundamentally different surface.
Machines and workflow: what equipment and settings you actually need
Producing true chenille requires more than swapping thread on a regular embroidery machine. A standard lockstitch machine cannot replicate Moss fills on its own.
- Dedicated chenille machines or combination machines with chenille attachments are needed to lay down looped pile.
- Needle height functions control loop height directly in Wilcom's EmbroideryStudio digitizing tools, and tie-ins at chain borders keep moss fills from unraveling at the edges.
- Compound chenille settings bundle these offsets and border functions automatically, cutting manual digitizing steps.
- Combination workflows let a single patch carry a chenille fill for the bulk of the design and a lockstitch pass for fine borders or lettering.
That last point matters for anyone trying to get crisp detail on an otherwise bold chenille piece: the two stitch families are not mutually exclusive on the same patch.
Appearance, detail and sizing: what reads well in each technique
Chenille's pile obscures anything small. A letter or shape under roughly an inch tends to blur into a soft blob rather than a crisp mark, so Wilcom's chenille guidance treats design boldness as a direct result of the stitch mechanism, not just thread thickness. Embroidery, by contrast, can hold stroke widths and letterforms several times smaller because lockstitch lies flat.
Before sending art to production, run it through a short checklist:
- Review the design at its actual finished size, never at screen zoom.
- Avoid tiny type or thin serifs in chenille artwork.
- Favor bold, simple shapes with generous negative space.
- Plan a chain-stitch border where you need a defined edge.
- Reserve fine detail, like a monogram or small logo, for straight embroidery.
Over-sewing a chenille fill with a lockstitch pass can add definition without losing the raised texture that makes chenille recognizable.
Durability and care: what the evidence says about wear and washing
Chenille's pile is its main strength and its main weakness. A 2014 application study on chenille yarn and fabric properties found that pile length, fiber type, and twist level materially affect abrasion resistance and color or reflectance change under cyclic abrasion testing, which means two chenille patches made with different yarns can wear very differently even with identical artwork, according to the abrasion research published in IJE Transactions.
Flat embroidery generally holds up better under repeated machine washing and friction, since there is no raised pile to flatten or shed. Chenille shows wear in stages: pile loss first, then a visible shift in color or sheen as the base thread becomes exposed.
Pro Tip: Wash a finished sample the same way the end customer will before approving a chenille run for retail, not just a dry mockup.
Fiber and construction choices discussed in research on ringspun versus carded cotton apply here too: tighter yarn construction and better fiber blends extend pile life, while the garment's own finish, as covered in work on enzyme wash t-shirts, affects how a patch ages alongside the fabric it sits on.

Construction choices: backing, edges and how patches get attached
Backing and edge finish shape how a patch survives daily wear as much as the stitch itself.
- Felt backing is common for chenille because it adds body without stiffening the raised pile.
- Cutaway stabilizer suits larger or denser designs, keeping the patch flat through repeated washing.
- Overlocked or satin-stitched edges secure chain-stitch borders and stop fraying at the perimeter.
- Sew-on attachment holds up better than adhesive on garments that see regular washing, like hoodies and sweatshirts.
- Caps and structured hats often need a firmer backing to prevent the patch from distorting on a curved surface.
Garment type should guide the final call: a hoodie front, as discussed in comparisons of hoodie versus sweatshirt construction, can carry a heavier chenille patch than a thinner sleeve panel.
DIY versus professional production: when to outsource the job
Home crafters can approximate chenille using chenille yarns stitched by hand or with a basic sewing machine, sometimes paired with a heat-press backing for stability. These faux-chenille methods give a similar fuzzy texture but lack the consistency of true Moss and Chain stitching, and loop height varies more from patch to patch.
- Try DIY for one-off projects, gifts, or low-volume runs where some variation is acceptable.
- Move to a specialist once you need consistent loop height across dozens or hundreds of units, since that control comes from needle-height settings on dedicated chenille machines.
- Outsource complex designs that combine chenille fills with fine lockstitch detail, since combination work needs equipment most home setups do not have.
- Factor in lead time: a tested sample run before a full order catches sizing or color issues before they multiply across a batch.
Pro Tip: Request a physical sample at finished size before committing to a production run, since screen mockups rarely reveal pile height or color accuracy.
Quick decision checklist and use-case matrix
A few quick questions settle most patch decisions fast:
- What effect do you want: raised texture or flat fine detail?
- What is the smallest element in the design, and can it survive the pile?
- How often will the garment be washed?
- What garment and placement will carry the patch?
- How large is the production run?
| Project | Recommended construction |
|---|---|
| Letterman-style patch with bold letters | Chenille |
| Small brand monogram or wordmark | Embroidery |
| Children's sweatshirt emblem, simple shape | Chenille with lockstitch border |
When the design is bold and simple, chenille wins on presence. When it is small or detail-heavy, embroidery wins on clarity, and that single tradeoff resolves most decisions before you touch a machine.
Rob's perspective: how we pick patch construction at Native303
Before approving any patch for production, it is advisable to run two checks: a test stitch at the actual finished size, and a laundering and abrasion sample that mimics how the customer will actually wear and wash the garment. Skipping either step is how a design that looked sharp on screen ends up blurry or frayed on a hoodie.
Placement matters as much as stitch type. A front-and-center hoodie patch takes more abrasion from bags and arms than a sleeve emblem, which often tips the choice toward embroidery for anything with fine detail and toward chenille only where the shape stays bold and the placement stays relatively low-contact.
— Rob
FAQ
What is the difference between chenille and embroidery?
Chenille uses Moss and Chain stitches to build a raised, looped pile, giving a fuzzy, three-dimensional surface, while standard embroidery uses lockstitch and satin stitches that lie flat against the fabric. This makes chenille better suited to bold shapes and embroidery better suited to fine detail.
What kind of machine do you need to make chenille patches?
True chenille requires a dedicated chenille machine or a combination machine with chenille attachments, since a standard lockstitch embroidery machine cannot produce Moss stitch loops on its own. Needle-height settings on these machines control the pile's loop height directly.
What is the difference between embroidery and patches?
Embroidery describes a stitching technique applied directly to a garment or to a separate piece of fabric, while a patch is typically a finished, pre-made piece attached afterward by sewing or adhesive. Either chenille or standard embroidery can be used to create a patch.
Is a custom chenille patch legit?
Custom chenille patches are a standard product in apparel decoration, produced by digitizing a design with Moss and Chain stitch settings on chenille-capable machines. Quality varies by producer, so a finished-size test stitch and a wash sample are reasonable steps before approving a larger order, something we build into our own custom design process.
Sources
- Traditional Chenille embroidery (Wilcom blog / docs)
- Chenille stitch types (Wilcom EmbroideryStudio online help)
- IJE Transactions B: Application — Chenille fabric abrasion and color change study
Where we take this next
If you have a shape in mind for a hoodie, sweatshirt, or tote bag and are not sure whether chenille or embroidery fits it, we work through that decision with you directly rather than leaving you to guess from a catalog. Our custom design service starts with your idea, whether it is a nostalgic Denver landmark or a bold varsity-style mark, and walks through stitch type, placement, and garment choice together before anything goes to production.

Browse finished examples in our showcase to see how chenille and embroidery read on real garments, check sizing on our size guide, or head to our storefront to see the full lineup of tees, sweatshirts, hoodies, and accessories ready for a custom patch treatment.